How to make your wash and go last
Whether your hair is corkscrew-tight or wavy, every long-lasting wash-and-go starts with a routine. Want to make your wash and go last longer? That doesn’t mean you need a 10-step arsenal. What matters more is finding a routine that works with your curls and sticking with it.
The real breakthrough is learning how to build your style, apply your products, and dry your curls the right way.
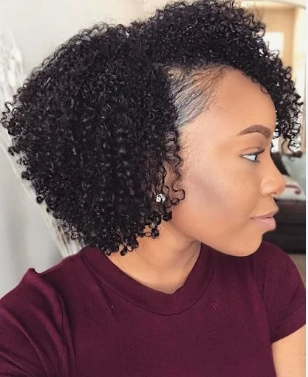
Step 1. Build Your Wash and Go With the LCOG Method
The real breakthrough for many wash-and-go routines is learning how to layer your products.
One method worth trying is LCOG: Leave-In Conditioner, Cream, Oil, and Gel. Each layer has a different job. The leave-in adds moisture, the cream gives your curls extra softness, the oil helps seal in moisture, and the gel provides the hold that keeps your curl definition in place.
Of course, you don’t have to use every layer every time. Your hair may need more or less product depending on its texture, porosity, and how it responds to different formulas. Think of LCOG as a framework, not a rulebook.
L — Start With Leave-In Conditioner
Leave-in conditioner sets the hydration stage.
Apply it to soaking-wet hair and work it through each section from root to tip. You want your hair to feel soft and moisturized, but not greasy or coated.
If your curls tend to feel dry quickly, a richer leave-in may work better. If your hair gets weighed down easily, try a lighter formula instead.
The goal is simple: give your curls enough moisture without creating buildup.
C — Add Cream for Extra Moisture
Next comes cream.
A curl cream can add another layer of moisture while helping soften and encourage your natural curl pattern. It can be especially useful if your hair feels thirsty or tends to lose moisture quickly.
However, don’t assume that more cream will automatically give you better curls. Start with a moderate amount and see how your hair responds.
O — Seal It In With Oil
A lightweight oil can help seal in the moisture you’ve already added and give your curls extra shine.
Jojoba or argan oil are examples of lightweight oils you might try. You don’t need a lot. A small amount is usually enough to smooth the hair and help reduce that dry, dull feeling.
If your hair already feels moisturized and easily gets weighed down, you may find that you can skip this step.
G — Lock In Definition With Gel
If you want your wash and go to last, hold matters.
Gel helps your curls keep their shape as they dry. It creates the cast that holds your curl pattern in place and helps fight frizz as the days go by.
Look for a gel that gives you the amount of hold your hair needs. You don’t have to avoid a gel simply because it creates a cast. Once your hair is completely dry, you can gently soften that cast to reveal softer, bouncier curls.
Pro Tip: Do the Hand Test Before Applying Your Products
Before you layer several products onto your entire head, test them together first.
Put a small amount of each product on the back of your hand and rub them together. If they blend smoothly, your combination is probably fine. If they start clumping, curdling, or forming little flakes, rethink the combination.
A few seconds of testing can save you from discovering product incompatibility after your entire wash and go has dried.
Step 2. Apply Your Products the Right Way
You can have the perfect products and still end up with a short-lived wash and go if you rush the application.
The key is to work in sections and make sure your products reach the hair evenly.
Try the Shingling Method
Shingling is a great technique when you want more defined, long-lasting curls.
Start with a small section of soaking-wet hair. Apply your products, then use your fingers to rake or smooth them from root to tip.
As you smooth the hair, you’ll notice individual curls beginning to clump together. Keep working through the section until the product is evenly distributed and the curls are taking shape.
Yes, this can take a little longer than quickly applying product to your whole head. But if definition and longevity are your priorities, the extra time can be worth it.
Don’t Forget Your Roots
When you’re focused on creating beautiful curls, it’s easy to concentrate on the middle and ends of your hair.
Don’t forget your roots.
If your roots don’t receive enough water or product, they can become fluffy and undefined while the rest of your hair still looks great.
Keep Your Hair Soaking Wet
Water is one of the most important parts of a wash and go.
Apply your products while your hair is soaking wet. Water helps your curls clump together and makes it easier to distribute your products evenly.
If your section starts drying while you’re working, add more water. You don’t need to drown your hair, but you do want enough moisture for your curls to form naturally.
Important Tip: Don’t Rush This Part
A wash and go isn’t the time to work with half-dry hair just because you want to finish faster. If you want better definition and less frizz, give your curls enough water from the beginning.
Step 3. Choose the Best Way to Dry Your Wash and Go
You’ve finished applying your products. Now comes the part that can make or break all that work.
Your drying method matters because disturbing wet curls can quickly create frizz.
Hooded Dryer: Best for Low Manipulation
A hooded dryer can be a great choice when you want your curls to dry evenly without constantly touching or moving them.
Once your hair is under the dryer, you can simply let it dry. Less manipulation means fewer opportunities to disturb your curl clumps.
Plus, the controlled airflow and heat can help your style set without the constant movement that comes with some other drying methods.
Air Drying: Simple but Requires Patience
Air drying is an easy option if you have the time.
The biggest challenge is resisting the urge to touch your hair while it dries. Every time you fluff, separate, flip, or play with wet curls, you can disturb the curl pattern and create frizz.
So once you’ve finished styling, hands off.
Diffusing: When You Need to Speed Things Up
A diffuser can help you dry your wash and go faster than air drying.
Use low or moderate heat and avoid aggressively moving the diffuser around your hair. Gentle drying can help preserve your curl pattern while reducing the amount of time your hair stays wet.
Whichever method you choose, remember the most important rule:
Let your hair become 100% dry before you start manipulating it.
Pro Tip: Oil Your Hands Before Stretching
Once your hair is completely dry, you may want to stretch or fluff your curls for more volume.
Before you do, lightly coat your hands with a little oil.
This can help reduce friction, add shine, and soften the gel cast without creating unnecessary frizz. Then gently separate or stretch your curls until you get the amount of volume you want.
Why Is My Wash and Go Frizzy?
You’ve followed the routine, but your wash and go still looks fluffy after a couple of days. What happened?
Before you blame your products, look at what happens after wash day.
Not Protecting Your Curls at Night
Your nighttime routine can make a huge difference.
Cotton pillowcases can create friction while you sleep and may absorb some of the moisture from your hair. Satin or silk can help reduce that friction and keep your curls from getting as tangled or flattened overnight.
For longer hair, try the pineapple method. Gather your curls loosely at the top of your head and secure them with a soft hair tie. Keep it loose enough that you aren’t creating tension.
For shorter curls or tighter textures, banding may be a better option. Loosely stretch sections with soft bands to help preserve shape and reduce excessive shrinkage overnight.
Touching or Restyling Your Hair Too Often
Touching, separating, and restyling your hair repeatedly can disturb curl clumps and create frizz. It can also make your style lose definition faster.
If you notice a little fuzz, don’t immediately redo the entire section.
Sometimes, leaving it alone is the best thing you can do.
A Little Frizz Is Normal
This one is easy to forget.
Your wash and go may become softer, fuller, and a little fuzzier after a few days. That doesn’t mean it has failed.
Perfectly defined curls on day one and lived-in curls on day four are both beautiful.
Instead of trying to eliminate every bit of frizz, focus on keeping your hair moisturized, manageable, and healthy.
Final Thoughts
A wash-and-go takes some patience and practice. Some people are naturally good at styling their curls and can get it right on the first try. Others may try different techniques and still feel like they can’t quite get the results they want. That’s completely normal. It can take time to figure out what works best for your hair.
You don’t have to wear a wash-and-go every time you want to show off your natural hair. If you’re ready to switch things up, a braid out or twist out can give you another low-manipulation curl style to try.
If you’re more interested in reducing daily styling altogether, a half wig or headband wig can also give your natural hair a break. A half wig can blend with part of your natural hair, while a headband wig offers an easy option when you don’t want to deal with leave-out.
If you’re considering a headband wig, check out our guide on Headband Wig Pros and Cons to see if it fits your routine.
